Since I thought the write up here on the site was lacking some pics, I thought I'd do my own.
First, gotta get the glass out. You need a big pot or something. I didn't have a pot big enough, but this Wok did the trick!

But, do NOT try to force the glass out. I wasn't thinking and pushed too hard....whoops. Fortunately this is hidden and not visible as installed:

It only takes about 5 minutes in boiling water to soften the sealant up enough to pry everything apart. This is what you end up with:

When you're prying the glass off, make sure you don't get any on the chrome inner housing. It screws it up. See pic:

Ok, so you've got the glass out. Time to remove the chrome housing. You can see in this pic that there's two screws holding it on.

Remove those two screws and lift up from the bottom to allow the retaining tab to slip free from the top mount shown below:

Now you're left with the outer housing and the projector assembly mounted inside:

The projector assembly is a bit more tricky to remove. There are two adjusting screws on the back but they won't free the projector assembly from the housing. The projector assembly is held in by an alignment assembly at the lower inside corner. This is screwed in to the assembly from the backside. To reach those screws, you have to back the lower outer adjusting screw out of the assembly pushing it outwards as shown below:

Then you can access the screws on the alignment assembly backside though the back of the housing:

Once those screws are backed out, you can back out both of the alignment screws from the projector assembly, freeing it from the housing. BE ADVISED that one of the screws is reverse threaded, so watch what you're doing. Once it's freed, you are left with the pic below:

In this pic you can see the alignment assembly that's left in the main housing:

Now, to take apart the projector assembly, from the backside you will see two screws.

Remove those, then remove the rear housing from the lens housing:

Don't worry about putting it back on the right way. There are alignment pins that will only let it go together one way:

Now it's time to disassemble the projector lens housing. From the front side, there are two screws located at top and bottom of the lens.

Remove those screws, then separate the lens retaining ring and the lens from the housing.

Time for the REAL work, creating and affixing the cutoff modification. We're all familiar with why it's needed and what the part is so here's what I did.
First, I created a cardboard template with the shape and size needed to do the job:

Then, I got myself some aluminum sheeting:

Cutting out a square big enough for the template, scribe the template pattern on to the piece you just cut out. HINT: Use a straight edge of the sheet for the top edge of the cutoff:

Using some aluminum shears or the like, cut your cutoff piece out:

Once the piece is cut, confirm it's the right size. trim if necessary to the right size:

Now you need to contour the piece to the shape of the housing so everything sits flush as shown below:


Now for the not so normal part. Most people have been using self tapping screws or something to affix the cutoff modification panel to the housing. I decided to go the pop rivet route because I don't want ANY chance of any kind of failure. I used a 1/8" pop rivet. I drilled the panel and housing at the same time on my drill press, so I didn't have a chance to take pics. But, as you can see below, two holes drilled allow two rivets to be put in place to retain the panel:


Pop the rivets, and I added a third to keep vibrations from causing a lighting flutter:


Now you can reassemble the projector housing in the reverse order that you took it apart. Set it aside and get ready for some tedious, time consuming, hand tiring work. Scraping the glass and housing free from all the old sealant. The glass will come free with a razor, but the housing is a different story as the majority of sealant is left in there. Fortunately, I found a trick that made it MUCH easier. A flathead screwdriver, and a small propane torch.

Doing a small section at a time, heat up the sealant, then come through with the screwdriver and scrape what you can out. With a few passes, you'll end up with the pics below, and you're ready to finish reassembling everything.


Put the projector housing back into the main housing and reattach everything starting with the alignment assembly, then move to the adjustment bolts. Once the projector is back in the housing, put the chrome inner housing back in. Now you're ready to tackle the glass.
I used ultra black RTV sealant in a caulk gun tube. This made it EXTREMELY easy to fill the recess for the glass in the housing. Just run a thick bead all the way around, press the glass back into the housing, and let it cure for 24 hours! Then put your rubber seal back on and the clips and you're done!
Questions or comments?
Addition!!!!! Side Marker Bulb housing modification for fitment to side marker harness connector.
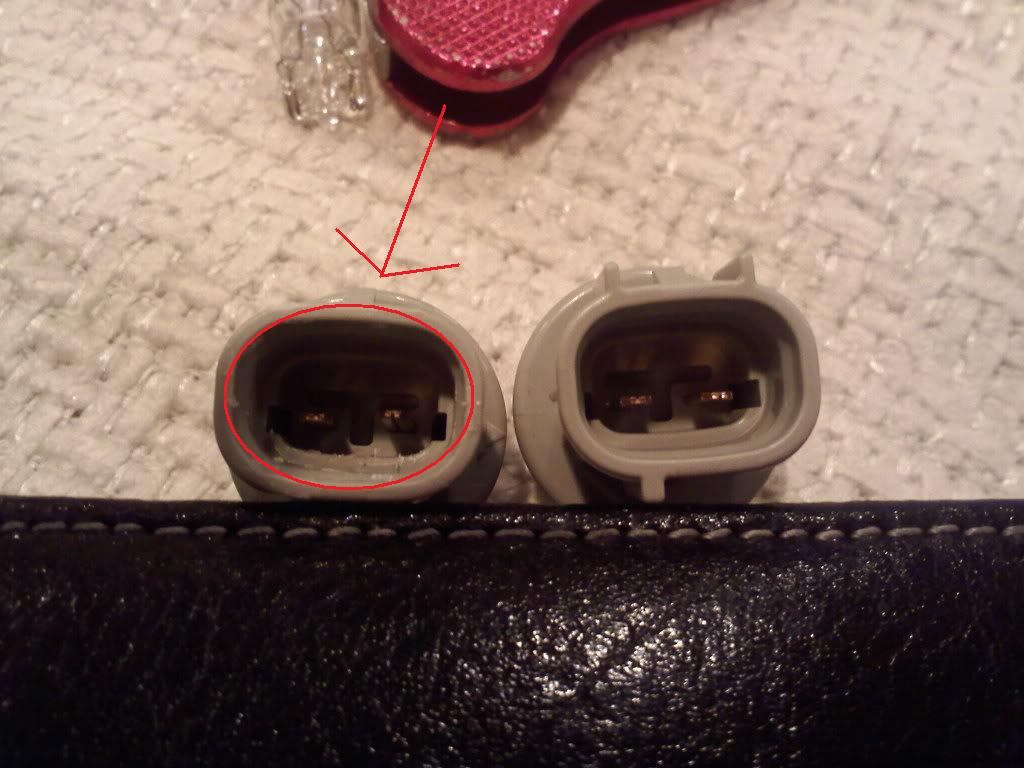
There are three alignment tabs for the accessory bulb housing that must be trimmed off, then it will fit in the side marker light connector. Below you can see a modded and unmodded bulb housing. This is pretty simple to do, jsut take a shop knife and trim little by little until it's gone and smoothed down.


This post has been edited by Fastbird: Mar 31, 2009 - 10:11 PM
First, gotta get the glass out. You need a big pot or something. I didn't have a pot big enough, but this Wok did the trick!
But, do NOT try to force the glass out. I wasn't thinking and pushed too hard....whoops. Fortunately this is hidden and not visible as installed:
It only takes about 5 minutes in boiling water to soften the sealant up enough to pry everything apart. This is what you end up with:
When you're prying the glass off, make sure you don't get any on the chrome inner housing. It screws it up. See pic:
Ok, so you've got the glass out. Time to remove the chrome housing. You can see in this pic that there's two screws holding it on.
Remove those two screws and lift up from the bottom to allow the retaining tab to slip free from the top mount shown below:
Now you're left with the outer housing and the projector assembly mounted inside:
The projector assembly is a bit more tricky to remove. There are two adjusting screws on the back but they won't free the projector assembly from the housing. The projector assembly is held in by an alignment assembly at the lower inside corner. This is screwed in to the assembly from the backside. To reach those screws, you have to back the lower outer adjusting screw out of the assembly pushing it outwards as shown below:
Then you can access the screws on the alignment assembly backside though the back of the housing:
Once those screws are backed out, you can back out both of the alignment screws from the projector assembly, freeing it from the housing. BE ADVISED that one of the screws is reverse threaded, so watch what you're doing. Once it's freed, you are left with the pic below:
In this pic you can see the alignment assembly that's left in the main housing:
Now, to take apart the projector assembly, from the backside you will see two screws.
Remove those, then remove the rear housing from the lens housing:
Don't worry about putting it back on the right way. There are alignment pins that will only let it go together one way:
Now it's time to disassemble the projector lens housing. From the front side, there are two screws located at top and bottom of the lens.
Remove those screws, then separate the lens retaining ring and the lens from the housing.
Time for the REAL work, creating and affixing the cutoff modification. We're all familiar with why it's needed and what the part is so here's what I did.
First, I created a cardboard template with the shape and size needed to do the job:
Then, I got myself some aluminum sheeting:
Cutting out a square big enough for the template, scribe the template pattern on to the piece you just cut out. HINT: Use a straight edge of the sheet for the top edge of the cutoff:
Using some aluminum shears or the like, cut your cutoff piece out:
Once the piece is cut, confirm it's the right size. trim if necessary to the right size:
Now you need to contour the piece to the shape of the housing so everything sits flush as shown below:
Now for the not so normal part. Most people have been using self tapping screws or something to affix the cutoff modification panel to the housing. I decided to go the pop rivet route because I don't want ANY chance of any kind of failure. I used a 1/8" pop rivet. I drilled the panel and housing at the same time on my drill press, so I didn't have a chance to take pics. But, as you can see below, two holes drilled allow two rivets to be put in place to retain the panel:
Pop the rivets, and I added a third to keep vibrations from causing a lighting flutter:
Now you can reassemble the projector housing in the reverse order that you took it apart. Set it aside and get ready for some tedious, time consuming, hand tiring work. Scraping the glass and housing free from all the old sealant. The glass will come free with a razor, but the housing is a different story as the majority of sealant is left in there. Fortunately, I found a trick that made it MUCH easier. A flathead screwdriver, and a small propane torch.
Doing a small section at a time, heat up the sealant, then come through with the screwdriver and scrape what you can out. With a few passes, you'll end up with the pics below, and you're ready to finish reassembling everything.
Put the projector housing back into the main housing and reattach everything starting with the alignment assembly, then move to the adjustment bolts. Once the projector is back in the housing, put the chrome inner housing back in. Now you're ready to tackle the glass.
I used ultra black RTV sealant in a caulk gun tube. This made it EXTREMELY easy to fill the recess for the glass in the housing. Just run a thick bead all the way around, press the glass back into the housing, and let it cure for 24 hours! Then put your rubber seal back on and the clips and you're done!
Questions or comments?
Addition!!!!! Side Marker Bulb housing modification for fitment to side marker harness connector.
There are three alignment tabs for the accessory bulb housing that must be trimmed off, then it will fit in the side marker light connector. Below you can see a modded and unmodded bulb housing. This is pretty simple to do, jsut take a shop knife and trim little by little until it's gone and smoothed down.
This post has been edited by Fastbird: Mar 31, 2009 - 10:11 PM