Over 1M Posts • 84K Topics • 9K Authors

Pics of my car...getting lots of makeovers. - 6G Celicas Forums

Topic #50183 98 posts Started by lubu
Cone bumper is on hold because the metal cutter is jammed, and I need to cut the crashbar by 1/3.. mad.gif

Anyways I started on the rear brake swap. Heres how I did it:

Took the wheel off...


Used a clamp to clamp the brake line before taking off the brake bolt.


To get the two bolts holding the capliper I used the HEX extension, its very hard to take the bolts off with a normal allen key (its size 14mm)


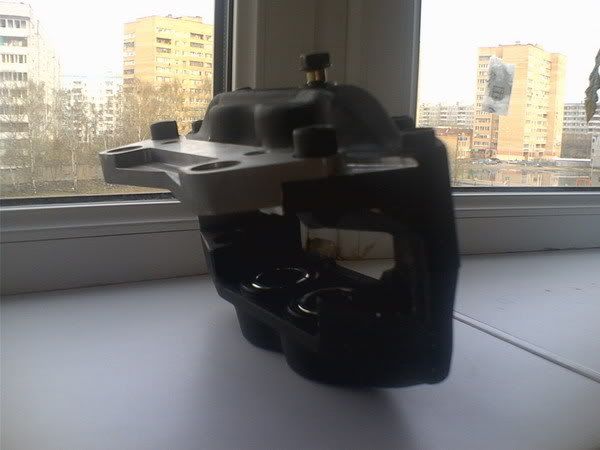
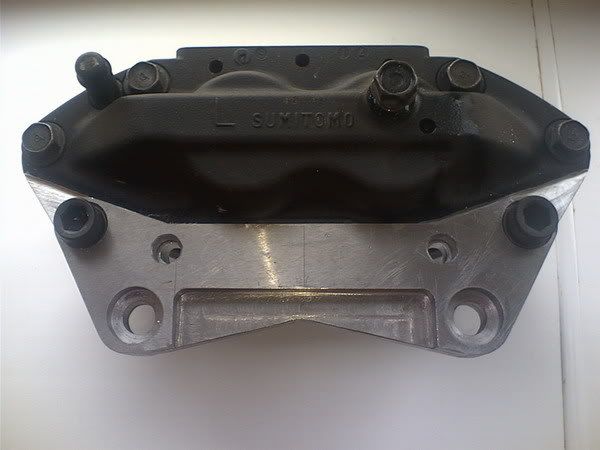
Its off, side by side with the ST205 capliper, suprisingly the stock capliper is heavier than the ST205... Took the disc off the ST205 assembly.


Slammed it on just to see how small our stock disc is.


The ST205 disc was scrapping the dustshield so I took a hammer and slammed it, only to relised that the whole thing needs to come off coz once I hammered it I cant align the caliper to the hole. The dustshield isnt welded all the way around (thank god smile.gif ), it has interval welded-joints and that made the removal process so much easier, I used a flathead screwdriver and hammer to dislocate the weld-joints. A 5 minutes job. I used a metal cutter to cut the remaining of the joints.


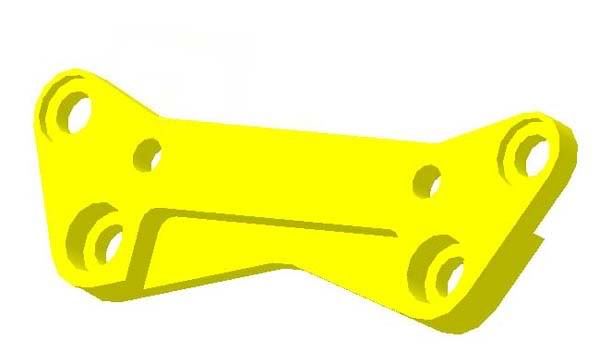
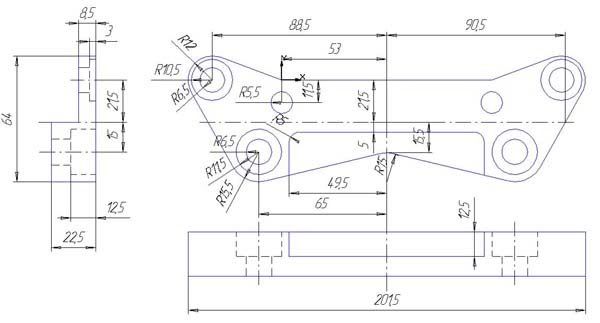
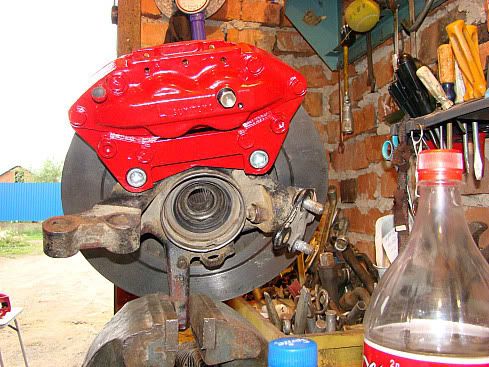
Everything is on, now I need to fix the offset. I'll probably use spacer(s) to align the caliper to the middle.


To be continued...


This post has been edited by lubu: Jul 21, 2008 - 10:54 AM

98% completion---aaRon
Wait a minute... are you telling me that those calipers fit "right on" (assuming you are using caliper spacers)!??!?!

One o'dem crazy Canadian freaks, eh?
>
QUOTE (GTSOwner @ Jul 22, 2008 - 12:45 AM) *
>Wait a minute... are you telling me that those calipers fit "right on" (assuming you are using caliper spacers)!??!?!


Yup the distance between the mounting holes are the same.

98% completion---aaRon
And this is not a popular brake swap becauusssee?!?!?! Why bother with 7th gens when the 2-pot GT-4 ones fit?

One o'dem crazy Canadian freaks, eh?
>
QUOTE (GTSOwner @ Jul 21, 2008 - 3:10 PM) *
>And this is not a popular brake swap becauusssee?!?!?! Why bother with 7th gens when the 2-pot GT-4 ones fit?


They might fit the rear, but not the front. Not to mention they are VERY difficult to find.

15PSI - 30MPG - Megasquirt Tuned
so st205 rears bolt right up basicly, interesting...

I bit of overkill if you ask me though. Your front are going to look tiny compared to the rear now biggrin.gif

my st205 swapandour Beams swap
>
QUOTE (Batman722 @ Jul 22, 2008 - 5:43 AM) *
>so st205 rears bolt right up basicly, interesting...

I bit of overkill if you ask me though. Your front are going to look tiny compared to the rear now biggrin.gif


Dont worry Batman, the fronts are next. biggrin.gif

98% completion---aaRon
>
QUOTE (lubu @ Jul 19, 2008 - 9:40 AM) *
>


I forgot you have the original one of a kind with the chamfered slots.
Looks like you are making good progress. smile.gif

This post has been edited by 97lestyousay: Jul 21, 2008 - 6:56 PM

JDM guy made me do it.
Had a bit of time today so I decided to finish off the conversion...

To position the caliper so that the disc is aligned to the center of the caliper I used bolt spacers, like these:


These spacers work like a champ, they snuggly fit into place and I gotta say they fit in perfectly, perfectly. I used three spacers for each of them. (three spacers made of a thickness of abt 5.5mm)


Tighten everything, everything is solid. I placed the wheel in and.. mad.gif ...the wheel didnt clear the caliper.
I remembered I bought a set (4) spacers a year ago but didnt use them coz they are 114mm instead of 100mm...obviously they wouldnt fit, soI cut them. biggrin.gif

into little pieces...


Not so bad...placed the wheel on. woOOlaaa...perfectly..just clear the caliper.!! woot.gif
Tested and working.
And here is a video clip showing that the wheel spins freely.
Note: the scrapping sounds is due to the rust formed rubbing against the pad. nothing major, should disappear after a good drive. smile.gif

and that concludes the "Rear ST205 brake swap".

(Ill get a proper wheel spacer set on eBay but for now its aint too bad)
A pic of whats coming...


edit: added more info.

This post has been edited by lubu: Jul 22, 2008 - 12:36 PM

98% completion---aaRon
How thick are your spacers and what are the specs of the wheels you are running? (diameter, width, offset)

One o'dem crazy Canadian freaks, eh?
>
QUOTE (GTSOwner @ Jul 23, 2008 - 1:01 AM) *
>How thick are your spacers and what are the specs of the wheels you are running? (diameter, width, offset)


The bolt spacers is 5.5mm for all three, the wheel sapcer is 10mm. As for the wheel, mine is probably the worse of all, they have concave spokes making it hard to clear to calipers (the front ones will be worse since the caps are bigger). I dont remember all the specs but they are 17 inch, offset is 40 I think.

98% completion---aaRon
Today I made a start on the ST205 front brakes swap. Didnt do that much coz the rotors arent trimmed to size but here is the progress so far...

Wheels are off. Brake lines were hold to stop fluid from dripping..


17mm wrench were used to take out those two monster bolts. They were abit hard to take out as the space were limited but with alot of swearings and fugly facial expressions I got them out. :mrgreen:
Here are two caps side by side for comparison.


The ST205 front caplipers has no thread in the mounting holes, nuts will have to be used.
One of my buddy will take care the trimming so its all good smile.gif

WIll update as soon as the rotors are back.

98% completion---aaRon
Those calipers are just SICK.

One o'dem crazy Canadian freaks, eh?
I wouldn't suggest using a nut.

I would use a tap and thread the GT4 calipers so that they function like the ones you took off.
much safer and a cleaner install.

great job so far
>
QUOTE (playr158 @ Jul 24, 2008 - 9:44 AM) *
>I wouldn't suggest using a nut.

I would use a tap and thread the GT4 calipers so that they function like the ones you took off.
much safer and a cleaner install.

great job so far

x2 - I'd like to make you some proper spacers for those back calipers if you'd let me [postage shouldn't be much?]. I can make them out of 4340 steel or possibly some stainless if I have the right size material left laying around here from one of our SS jobs. All I'd need are the dimensions of the set of washers you currently have installed [just 3 - ID, OD, and length is all I'd need]. Metric will be fine if that's what you're used to. I can also make a dimensional drawing for your use and so others can easily follow your footsteps. It would be my pleasure to contribute to the advancement of FWD Celica's.
It would benefit me too as seeing Darth Ripley's install first hand has convinced me of the power they are capable of - I'll be doing this sometime in the next year as well.

Nice job so far and an impressive set of updates/modifications/swaps. What happened with the engine swap? Saving that for last or changed your mind?

ENGINE: '93 RC 3S-GTE/WRC CT-20b [18-20PSI]PERF: TRD/HKS/ARP/NGK/MSD/ACT/Blitz/STRI/APEX'i/TwosRus/GReddy/Magnaflo/KOYOSUSP: Tein/Bilstein/SusTech/INT: SS-III SEATS/Toyota Hyper SportsEXT: WRC/TRD/404QUOTE (lagos @ Aug 25, 2010 - 10:13 AM)Its a safety feature so that people like you don't end up killing themselves or everyone around them.Slow down Paul Walker.6GC Chat - Go there: [url="http://www.griffgirl.com/forum/chat/index.php[/url]
>
QUOTE (DEATH @ Jul 24, 2008 - 10:10 PM) *
>>
QUOTE (playr158 @ Jul 24, 2008 - 9:44 AM) *
>I wouldn't suggest using a nut.

I would use a tap and thread the GT4 calipers so that they function like the ones you took off.
much safer and a cleaner install.

great job so far

x2 - I'd like to make you some proper spacers for those back calipers if you'd let me [postage shouldn't be much?]. I can make them out of 4340 steel or possibly some stainless if I have the right size material left laying around here from one of our SS jobs. All I'd need are the dimensions of the set of washers you currently have installed [just 3 - ID, OD, and length is all I'd need]. Metric will be fine if that's what you're used to. I can also make a dimensional drawing for your use and so others can easily follow your footsteps. It would be my pleasure to contribute to the advancement of FWD Celica's.
It would benefit me too as seeing Darth Ripley's install first hand has convinced me of the power they are capable of - I'll be doing this sometime in the next year as well.

Nice job so far and an impressive set of updates/modifications/swaps. What happened with the engine swap? Saving that for last or changed your mind?


Ill have a go at that route playr. thumbsup.gif

Thanks Death, Ill PM you the dimensions a little later. As for the engine swap we got it this far...


But unfortunately the engine isnt running as it should, strange/weird knocking sounds coming from the long block. Im empty handed atm so Illl have to chuck another 5sfe in there, lay low and wait for another day. frown.gif


98% completion---aaRon
Oh wow - so much work to undo. I have some spare rods and used but good shape pistons [.030 over bored] if you get it open and need some cheap fix LMK. As always I feel you should take these opportunities to upgrade but it would be a shame to let a few $$$ force you to reverse the swap work. If my parts can help LMK.
Hella progress tho man - keep it up biggrin.gif

ENGINE: '93 RC 3S-GTE/WRC CT-20b [18-20PSI]PERF: TRD/HKS/ARP/NGK/MSD/ACT/Blitz/STRI/APEX'i/TwosRus/GReddy/Magnaflo/KOYOSUSP: Tein/Bilstein/SusTech/INT: SS-III SEATS/Toyota Hyper SportsEXT: WRC/TRD/404QUOTE (lagos @ Aug 25, 2010 - 10:13 AM)Its a safety feature so that people like you don't end up killing themselves or everyone around them.Slow down Paul Walker.6GC Chat - Go there: [url="http://www.griffgirl.com/forum/chat/index.php[/url]
>
QUOTE (DEATH @ Jul 24, 2008 - 10:55 PM) *
>Oh wow - so much work to undo. I have some spare rods and used but good shape pistons [.030 over bored] if you get it open and need some cheap fix LMK. As always I feel you should take these opportunities to upgrade but it would be a shame to let a few $$$ force you to reverse the swap work. If my parts can help LMK.
Hella progress tho man - keep it up biggrin.gif


Thanks for the offer DEATH, I guess the real reason for me not to go with the swap is because next yr Ill go off to mine sites for two years to finish my degree and I cant take my car with mem:(. When Im back Ill do the 4th gen caldina conversion and AWD conversion biggrin.gif . This is one car that Ill not sell.

98% completion---aaRon
Bought a new Angle Grinder today... smile.gif
Glove, safety glass, earmuff...and its cut away...


...done.


But Im having problem with the sides, I cant get the sides to fit properly. It looks like its going to give in but its not, and Im dont wanna use too much force...


Should I just push it a little more or is there a proper way of doing this??

98% completion---aaRon
hey man how is the front brake swap going?


i was doing a little research and found out how some guys from a russian forum did a st205 brake swap on a caldina. they used custom caliper brackets to provide the proper offset and accomodate the caliper for the larger st205 brake rotors.


more info here
>click on "Firms & Styling"
>look for "фотоотчет об установке 205-х тормозов на Gt-t" as the topic title

This post has been edited by azian_advanced: Aug 4, 2008 - 3:07 PM

----------------------------------------------------------------------------------------------------------------------------------------------------------------
I was going to do just that, but I decided against it because:
a.You will need to cut the mounting holes (areas) completely off as shown in the pic above, other wise the difference is too small to make a bracket.
b.You will not lose much (if any) surface contact even if you trim the rotor down to 297mm.

Heres why:


The outer circle is of course the original 315mm rotor and the inner circle is the 297mm trimmed rotor.
Now the surface contact between the pads and the rotor is in red, even if you extend the diameter and use the bigger rotor the surface contact will pretty much remains the same.

...and there is an advantage to the trimmed rotor, it weights less biggrin.gif

let me know if my logic is wrong.

98% completion---aaRon
isn't that a bad idea cutting the crash bar?

~AndyTwin '95 3S-GE's - SS-III & Curren'08 Mazda3Axela i Sport -"Zoom Zoom"Check out my Droid Goodies|My Flickr
Here is the rest of the ST25 front brake conversion.

I could have trimmed to the rotor to 300mm but I went with 297mm and you will see why later.
Trimmed and resurfaced, just like new. biggrin.gif


Ive heard that for the ST185 conversion the rotor hits the lower balljoint so 4mm spacer is needed but...lucky for us, it clears the lower balljoint by a few mm. smile.gif


The OEM bolt is too short now so I went and buy 4 new nuts (with nylon tips) and bolts, it really doesn matter how long they are just make sure that they cover everything and you are good to go. The only thing that you need to be aware of is the threading of the nut, be sure to buy smaller thread mine is 1mm, so that the nut doesnt vibrate and lose-off. The capliper now mounts the opposite way meaning that it goes behind the mounts on the knuckle and the mounting procedures becomes extremly difficult. Because first irst you'll have to put the rotor on and then the capliper goes on, and by now there is really no way to slide the nut in from the front, you could go and slide it in from the back to make thing easier but you cannot hook the nut into place due to the tight space. (if you thread the mounting holes on the steering knuckle then everything will be easier)
I had to chopped mine off abit so I can manneuver them later.


So the capliper went on and we can see that there is a slight offset, I needed to bring the capliper out by a few mm, the offset is actually worst than whats showing in the pics.


I had no choice but to grind down the capliper mounts...this is the most time consuming part because at the start I dont really know how much I should grind, so I started grinding mm by mm and test it after every mm so see if it centered and from 16.5mm down to.....10mm..YUP you got that right a whole 6.5mm off. frown.gif


At this point its about 6pm and I started at 3pm, 3 hours of pure back-bending, stomach aching and god knows how many times I swear...LOL but the show must goes on so now I need to reassemble everything. To do this I let the rotor lose and pulled it out all the way to just before it drops off, now I put two pre-cut bolts into place but didnt let them protrude to the other side just level with the other side will do. Next I slided the capliper, carefully to the rotor and positioned so the mounting hole lined up. Next I used a flathead screw driver to push them out to the other side.


There is another way of doing it, you will need to part the caliper into two halves then bolt on side to the knuckle then slide the rotor in and bolt the other side on.
If you did everything right the rotor whould align itself to the center of the cap, just a matter of bolting the nuts tightly into place. I used two wrenchs, one for the nut and the other to keep the bolt from rotating.
...and here it is, yes I do need some new brakelines. Bleed the brake and there you have it, the ST205 brake conversion.


Just a quick note on azian_advanced's post, as you can see the contact between the pads and the rotor is excellent, all of the area on the pads are contacting the rotor so dont worry abt sacrifying that 18mm (its actually 9mm but it counts as 18mm when you measure it as diamter's)


NOTE: Im dead tired so if any of the above is not clear let me know and Ill try again.

This post has been edited by lubu: Aug 9, 2008 - 9:54 AM

98% completion---aaRon
good post... i understood pretty much everything you wrote. what you did is the best way to go about it. threading the knuckle and getting bolts with threading that go all the way up to the head of the bolt would be something i would do if i were to do this brake conversion so that the knuckle and caliper are more secure.

if, and only if, you had kept the original diameter of the rotors and extended the caliper with a bracket (or whatnot), and although the contact surface of the brake pad to the rotor remains the same, you gain brake force due to increased leverage (but gain in rotational mass from the larger rotors). but certainly that would be the more difficult way to do this conversion.


so basically, the minimum steps are:
-get new caliper bolts and nuts to mount the caliper to the back of the knuckle (get ones with more threads so the nut is less likely to loosen itself)
-trim the rotor from 315mm to 297mm (might as well get them resurfaced if you get used ones)
-grind the inside of the caliper mounting locations from 16.5mm to 10mm
-get st205 brake lines (might as well get braided ones) and bleed the system


doesn't seem so bad. i might even try this some day..

----------------------------------------------------------------------------------------------------------------------------------------------------------------
Im looking to buy one of this set..Can someone tell the the model of these, all I know is that they are racing hart's.


98% completion---aaRon
>
QUOTE (azian_advanced @ Aug 10, 2008 - 1:48 AM) *
>good post... i understood pretty much everything you wrote. what you did is the best way to go about it. threading the knuckle and getting bolts with threading that go all the way up to the head of the bolt would be something i would do if i were to do this brake conversion so that the knuckle and caliper are more secure.

if, and only if, you had kept the original diameter of the rotors and extended the caliper with a bracket (or whatnot), and although the contact surface of the brake pad to the rotor remains the same, you gain brake force due to increased leverage (but gain in rotational mass from the larger rotors). but certainly that would be the more difficult way to do this conversion.


so basically, the minimum steps are:
-get new caliper bolts and nuts to mount the caliper to the back of the knuckle (get ones with more threads so the nut is less likely to loosen itself)
-trim the rotor from 315mm to 297mm (might as well get them resurfaced if you get used ones)
-grind the inside of the caliper mounting locations from 16.5mm to 10mm
-get st205 brake lines (might as well get braided ones) and bleed the system


doesn't seem so bad. i might even try this some day..


To sum everything up.
For the rears:
Pretty much bolt-on except the 5.5mm spacers for the caplipers.

For the fronts [quote from az_ad]:
so basically, the minimum steps are:
-get new caliper bolts and nuts to mount the caliper to the back of the knuckle (get ones with more threads so the nut is less likely to loosen itself)
-trim the rotor from 315mm to 297mm (might as well get them resurfaced if you get used ones) + you can probably trim them down to 300mm if you wish.
-grind the inside of the caliper mounting locations from 16.5mm to 10mm
-get st205 brake lines (might as well get braided ones) and bleed the system

One more thing and this is the most expensive of all, you might (most probably) have to get a new set of rims as the old ones wont clear the caplipers.

98% completion---aaRon
amazing stuff thumbsup.gif

FYI if you just get some spacers (15-20mm) you should be able to clear the calipers with your rims.

my st205 swapandour Beams swap
I need new brakelines and ATM I cant afford any decent ones as they cost a fortune and no point buying crap ones. The good thing is when you get ur ST205 brakes chances are you will also get the brakelines as well, if you do then you will find that with little mods you can make them to work on ur ST204 smile.gif

I tested the connection between the hardline and the brakeline and they are perfect fit, which is a good start and here are two brakelines side by side, the shorter is of course the ST204's. You will need to cut the brackets off as the mountings are completely different between the two. For me I used an angle grinder for the job, gloves, safety galsses and earmuffs are a-must.


After some cutting and grinding you should have something that look like this, remember not to cut or grind into the rubber line or you're going to have problems later. You'll then need to round the hexagon heads and make a smaller grove so that the holding clip can slide across like the ST204's, so they can fit through the mounting plate.


Another 15 mins...


to be cont....


98% completion---aaRon
Here is the rest of the brakelines conversion. Ill let the pics speak for themselves.


It will have to be like that for now.....


98% completion---aaRon
Damn nice work! Rear spacers are finally on their way [$47 later - that's just redicualous for a 1lb package IMO]!
Anybody else wants to do this I can post up the drawing I made for the spacers and/or I can make the spacers for you - just allow me a week or two to get them done and shipped. wink.gif
Badass Lubu - I will def be tackling this with your info in the very near future [Gotta get the $$$ up and order me some parts] biggrin.gif

ENGINE: '93 RC 3S-GTE/WRC CT-20b [18-20PSI]PERF: TRD/HKS/ARP/NGK/MSD/ACT/Blitz/STRI/APEX'i/TwosRus/GReddy/Magnaflo/KOYOSUSP: Tein/Bilstein/SusTech/INT: SS-III SEATS/Toyota Hyper SportsEXT: WRC/TRD/404QUOTE (lagos @ Aug 25, 2010 - 10:13 AM)Its a safety feature so that people like you don't end up killing themselves or everyone around them.Slow down Paul Walker.6GC Chat - Go there: [url="http://www.griffgirl.com/forum/chat/index.php[/url]